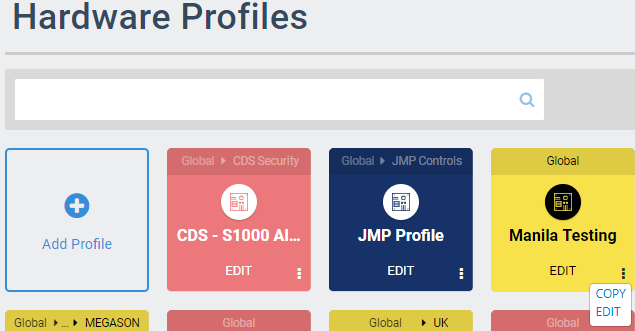
S1000 Template
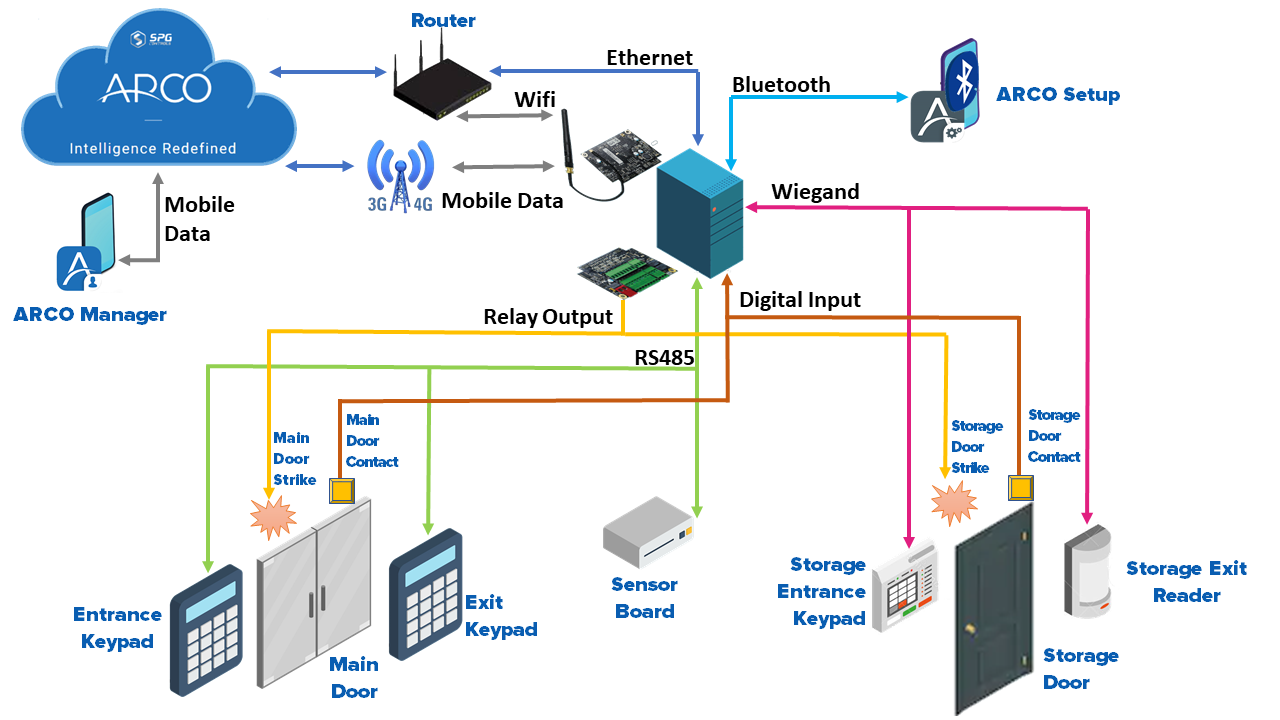
/in Data Fields configuration, data fields, device, Hardware, Profiles, S1000, template /by Steve BartonThe S1000 Smart Controller can remotely manage access control and alarms as well as building management functions.
The S1000 can be expanded using adaptor modules and other network IO devices.
Please refer to the S1000 Controller Installation Manual (S1000-001) for further configuration details.
S1000 Configuration
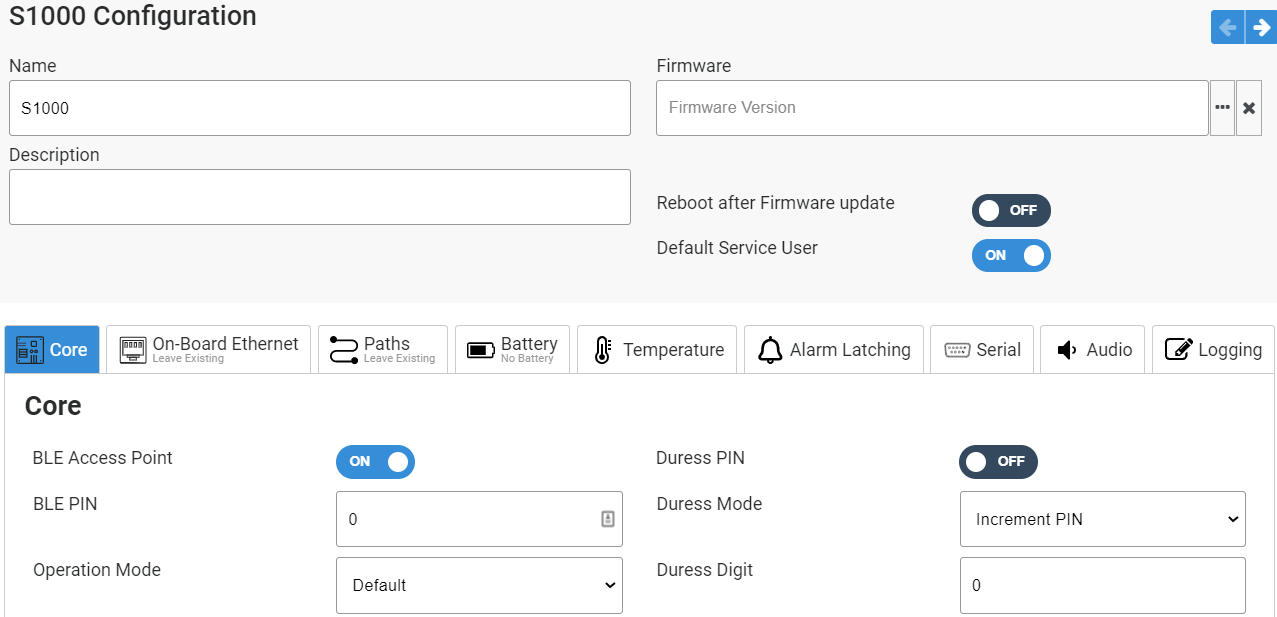
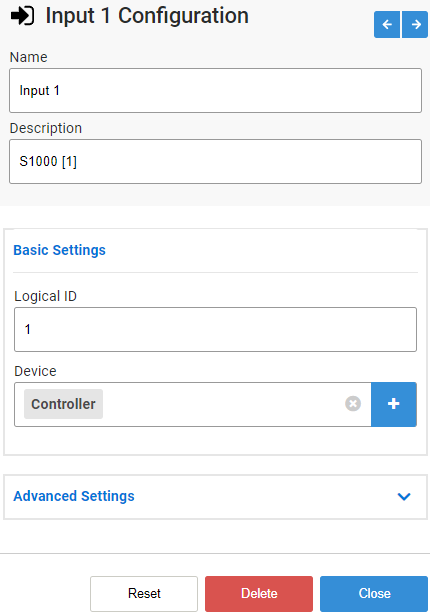
- Name – Needs to be unique for each controller. Requires alphanumeric characters with no spaces with a maximum length of 255.
- Description – Requires alphanumeric characters with a maximum length of 255. Does not need to be unique.
- Firmware – Click the button to search the firmware file using the file browser.
- Reboot after Firmware update – Toggle ON or OFF.
- Default Service User – Toggle ON or OFF.
Select each TAB for the different component configuration options.
Core Configuration
- BLE Access Point – Toggle ON or OFF to enable the Bluetooth receiver of the S1000 Smart Controller
- BLE PIN – Numerical Value
- Operation Mode – Select from the drop-down menu
- Default – Use the SPG Proprietary operations settings
- EN Grade 3 – Use EN 50131 Compliant Grade 3 operation settings
- EN Grade 4 – Use EN 50131 Compliant Grade 4 operation settings
- Custom – Use custom made operation settings
- Area – Select from pop-up. Location where the S1000 Smart Controller is installed
- Report Events – Toggle ON or OFF
- High Priority – Toggle ON or OFF
- Report To – Checkbox
- Report Timer Change to – Checkbox
- Time Sync Period – Numerical Value
- SD Card User DB – Toggle ON or OFF
- SD Card Event Queue – Toggle ON or OFF
- Allow Config and Commands without Engineer – Toggle ON or OFF
- Allow Input Self Test while Arming– Toggle ON or OFF
- Language – Select from the drop-down menu.
- Keypad Login Mode – Select from the drop-down menu.
- Duress PIN – Toggle ON or OFF
- Duress Mode – Select from the drop-down menu.
- Duress Digit – Numerical Value
- Card Suspension due to Invalid Access – Numerical Value in minutes
- Update Keypad Alarm LED – Toggle ON or OFF
- Suspect Activation Counter – Numerical value. The number of times an alarm trigger will send before it stops.
- Alarm Confirmation Time – Numerical value in second. Duration of time an alarm signal is received before an alarm message is triggered.
- Custom Area Mode 1 - Name – Alphanumeric characters. Name of the first custom user access on the control panel.
- Custom Area Mode 1 - Duration – Numerical value in second. Duration a Custom User 1 can log into an Area.
- Custom Area Mode 2 - Name – Alphanumeric characters. Name of the first custom user access on the control panel.
- Custom Area Mode 2 - Duration – Numerical value in second. Duration a Custom User 1 can log into an Area.
- Auto Extend Pin Validity – Toggle ON or OFF
- Extend Pin Validity – Numerical Value in days
- Sequential Alarm Mode – Toggle ON or OFF
Click the arrows to quickly switch between component panels.
On-Board Ethernet
Select from the drop-down menu.
- Leave Existing – ARCO Platform will not download any On-Board Ethernet settings. The settings programmed using the keypad or mobile app will be retained.
- Enable – ARCO Platform downloads and overwrites any On-Board Ethernet settings on the S1000 Smart Controller.
- DHCP – Toggle ON or OFF for automatic configuration of the controller Ethernet.
- IP Address – Numerical value. Manually input the controller IP address.
- Subnet Mask – Numerical value. Manually input the controller subnet mask.
- Gateway – Numerical value. Manually input the controller gateway.
- DNS – Manually input the controller DNS.
- Disable MAC and ARP Processing – Toggle ON or OFF.
- Enable SNMP – Toggle ON or OFF.
- Disable – Disable the Ethernet port on the S1000 Smart Controller completely.
Paths
Select from the drop-down menu.
- Leave Existing – ARCO will not download any Paths settings. The settings programmed using the keypad or mobile app will be retained.
- Enable – ARCO Platform downloads and overwrites any Paths configuration on the S1000 Smart Controller.
ARCO Platform enables your system to have consistent and reliable connections through the redundancy of Paths.
Connection priorities are divided into Primary, Secondary and Tertiary Paths.
ARCO Platform automatically switches Paths when the previous one is not available.
Path Navigation
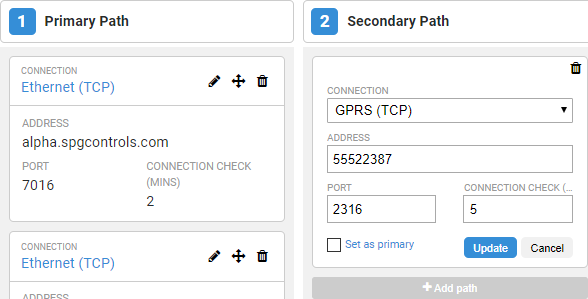
- Click to edit the Path panel configuration.
- Click to drag-and-drop a Path panel to a different priority location.
- Click to delete a Path panel.
- Add path to add a panel.
- Connection – Select from the drop-down menu. Type of Network connection.
- Ethernet (TCP) – Transmission Control Protocol for built-in Ethernet connection.
- GPRS (TCP) – Transmission Control Protocol mobile connection.
- WiFi (TCP) – Transmission Control Protocol for expansion card Ethernet connection.
- Ethernet Expansion (TCP) – Transmission Control Protocol mobile connection.
- PSTN – Public Switched Telephone Network connection.
- Address – Alphanumeric characters.
- Port – Numerical value. Port address of the connection.
- Connection Check – Numerical value.
- Set as primary – Check to set the connection as the default Path.