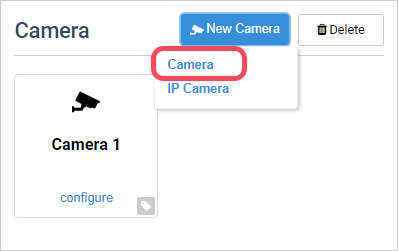
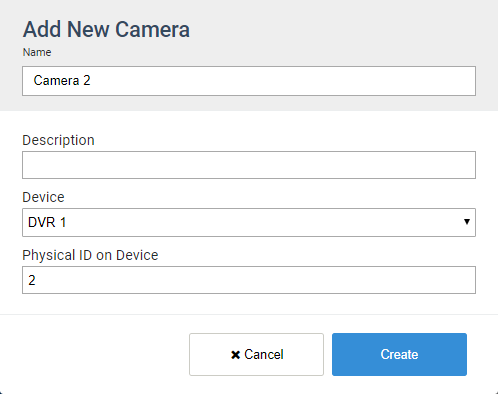
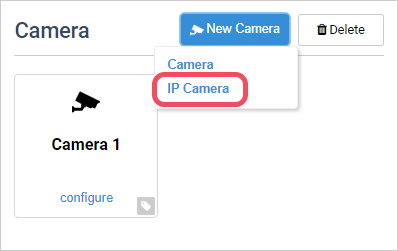
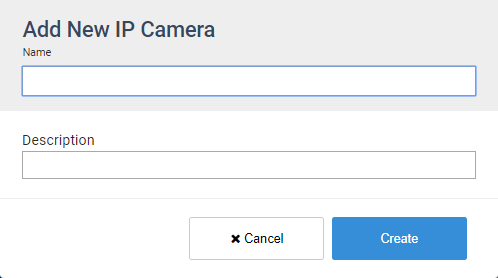
1111

Alarm Management

ARCO enables you to monitor quick and detailed communication between system sensors and the S1000 Smart Controller with a centralised Alarm monitoring module.

  • Active Alarm – Displays the numerical value of all currently active alarms in the system.

    Clicking on the Alarm Panel sends you to the Alarm Dashboard.

  • Dismiss All – Click to ignore all active alarms in the system.

  • Alarm Name – Displays the custom name of the alarm. Please refer to the Alarm Kind section below for more details.

  • Alarm Icon – Displays the custom icon of the alarm. Please refer to the Alarm Kind section below for more details.

  • Alarm Details – Displays the timestamp of the alarm and the event name trigger.

  • Control Buttons – Click to suspend or dismiss the selected alarm.

Alarm Dashbord

Location Services

ARCO enables you to define an area that a user and asset through the Location Service. The location is obtained from the GPS coordinates, or the Readers recently used.

Location Management

The Location is the default page displayed when clicking the Hardware module.

  • Location Count – Number of Locations currently in the system.

  • Add Location button – Enables you to add a new Location in ARCO. The next section will discuss the full details about adding sites.

  • Card Panel – Displays the details of the Location. Click to view Location information.

  • Show More – Click to display more Locations.

Location Information

Click the Location card panel to view the Location Information

  • Edit button – Enables you to edit a Location in ARCO.

  • Location Information – Details about the location.

  • Map – Displays the google map details of the Location.

  • Readers-In – In Readers assigned to the Location.

  • Readers-Out – Out Readers assigned to the Location.

  • Users – List of users currently in the Location.

Add Location

ARCO enables you to add new Locations to the Location Management page.

Reports

Access to real-time information helps you visually understand changing business conditions so you can make decisions based on the real-time data you have gathered with reports. ARCO enables you to identify trends, sort out quantities, and measure the impact of system activities.

Report Management

ARCO enables you to display Reports based on selected search words and information filters. The Reports can then be downloaded for sharing or used for more complex analytics. 

Available reports are for Users. Credentials, Status, Events and Sites. 

  • Search bar – Enables you to search for specific Reports by their name.

  • Report filter – Click to open and close panels for each Report type available.

  • Add Report panel – Enables you to add new Reports in ARCO. The next section will discuss the full details about adding Reports.

  • Report Panel – Displays the details of the Report. Click to view the information.

Add Report

Report Configuration

  • Name – Unique name of the report.

  • Description – Short information about the report.

  • Save button – Click to save the report.

  • Export –Download the displayed report in different file formats: CSV, PDF or XLS.

  • Column header – Displays the data types on the current report

  • Search Bar – Enables you to search for specific data.

  • Search Filter – Enables you to specify the data types to be displayed.

Video Configuration

The ARCO Platform features a built-in Video Service API enabling integration to third-party video cameras.

For advanced video surveillance requirements, ARCO Video Proxy Server is a stand-alone software solution designed to install within a closed network. The Video Proxy Server enables the integration with any third-party video system which are ONVIF compliant or supports RTSP streaming.

Configurable Dashboard enables the full control of video displays within the ARCO Platform.

Add Device: DVR

Add Camera

Add IP Camera

Configure Widget: Rtsp Camera

Update Site

Alarm Area Mode

In this mode, you use normal user access to go in and out of areas based on the users’ area role settings. Note this applies only to areas set for Limit Area and will only allow disarm or partial disarm when this setting is enabled. Arming this area only requires a single user.

Dual Alarm Area

In this mode when the keypad is set for single area login, and the area is configured for the dual user, the keypad will prompt for two (2) value users ( user ID /PIN ) to allow disarming of the single area. Disarming means disarm or partial. Any user can arm the area, and dual is not required.

Dual Supervise Alarm Area

This is same as dual alarm area except at least one of the users must be a supervisor.

Access Control Mode

In this mode, you use normal card access to go in and out of areas. The readers are assigned to do read valid cards and determine if two (2) valid cards are required to enter.

In all cases of dual area operation, the user counts are maintained, and people are tracked through the areas.

Dual User Area

ARCO Platform enables you to configure an area requiring a minimum of two (2) users present at a given time. The first person to enter will be prompted after valid entry for a dual user so that two (2) people will then be marked in the new dual user area. Any subsequent user can enter, and any user can leave so long as there are at least two (2) people present. When the last two (2) people leave, they will be prompted to both badges to leave.

Dual Supervisor Area

Similar to Dual User Area except at least one user has to be a supervisor.

Entry / Exit Time Attendance

For this mode of operation, when the out reader is used, the user is marked as being out of the building. This mode can also be used for Time Attendance; if the door category is In/Out, then the keypad readers will show the entry or exit message along with the Granted message to feedback to the user they are entering or leaving.

Profile Panels

Reader

Readers are used to perform user interactions on a door. The reader will inherit the properties of a Door for allowing users to present cards or enter pins. There is no need to have any schedules attached to a Reader.


Name – Needs to be unique for each controller. Requires alphanumeric characters with no spaces with a maximum length of 255.


Description – Requires alphanumeric characters with a maximum length of 255. Does not need to be unique.


Logical ID – Numerical value. The unique identifier assigned to a device connected to the S1000 Control Panel.


Device – Select from the pop-up menu.


Controller – Third-party Wiegand readers.


 Keypad – SPG Keypad readers.


Physical ID on Device – Numerical value. Unique identifier configured into the device.


Area – Select from the pop-up menu.


Report Events – Toggle ON or OFF to record reader events.


High Priority – Toggle ON or OFF to assign high priority.

Doors

ARCO Platform enables the support of up to eight (8) Doors in a single S1000 Smart Controller. There are a series of properties that determine the behaviour of the door. Each Door can have up to two (2) readers attached (one on each side of the door), one egress input, one door strike output, one door contact input and one strike contact input.


Name – Needs to be unique for each controller. Requires alphanumeric characters with no spaces with a maximum length of 255.


Description – Requires alphanumeric characters with a maximum length of 255. Does not need to be unique.


Logical ID – Numerical value. The unique identifier assigned to a device connected to the S1000 Control Panel.


Reader In – Select from the drop-down menu. Card or Keypad reader assigned to enter the door.


Reader Out – Select from the drop-down menu. Card or Keypad reader assigned to exit the door.


Door Contact Input – Select from the drop-down menu.  Defines the input on the controller to be used for Door Contact monitoring


Egress Input – Select from the drop-down menu.  Defines the input on the controller to be used for the Egress to grant access to a door by using a pushbutton or similar.


Strike Output – Select from the drop-down menu. Defines the output on the controller to be used to activate the electronic strike on a door to allow the door to be opened.


Locked Schedule – Select from the drop-down menu. The schedule used to specify that this door remains locked.


Unlocked Schedule – Select from the drop-down menu. The schedule used to specify that this door remains unlocked.


Card and PIN Schedule – Select from the drop-down menu.  Specify that this door requires card and pin to be used to access.


Card or PIN Schedule – Select from the drop-down menu.  Specify that this door requires a card or pin to be used to access. If no schedule is defined, then Card Only will be the default


Egress Schedule– Select from the drop-down menu. Enable the egress button to be used. If no schedule is defined, then Egress will always work.


Strike Time (sec) – Numerical value. Time until the door opens.


Shunt Time (sec) – Numerical value.  Time to allow the person to enter/exit.


Embarrassment Time (sec) – Numerical value. Time until to issue an embarrassment warning.


Lock – Select from the drop-down menu. Normal or Magnetic


Report Events – Toggle ON or OFF.


Do Not Send Forced – Toggle ON or OFF.


Do Not Send Ajar– Toggle ON or OFF.

Door Schedules

If there are no door schedules defined, then the door will be in a mode that allows cards to be used to access (normal mode operation). If there is a door schedule for locked defined and the time schedule is valid, then the door remains in a locked state. If there is a door schedule defined and the time period is invalid, then the door is in the normal state or the state defined by the unlocked schedule. The locked schedule overrides the unlocked schedule. If there is an unlocked schedule defined, then the time period for unlocking the door is checked, and if valid, the door will be set to the unlocked state. If neither the locked nor unlocked schedules are defined, then the door remains in the normal state and will allow access using the normal access control procedure.

Please refer to the Schedules section below for further details.

Door Access

For access control operation, there is also a time schedule defined to determine the behaviour of the readers attached to the door. If there is a time schedule defined for Card plus PIN, then the reader will prompt for PIN entry after a card is presented. If there is no schedule defined or the time period is not valid for card plus PIN, then the reader will check for the schedule Card or PIN, and if this is defined, then the reader will allow for entry of a PIN or the swipe of a card. If there is no Card of PIN schedule defined or the time period is not valid, then the reader will default to card only mode. There is a setting on the system that defines that the entry of PIN requires an ID to be also entered.
Commands can be sent to a door to Lock and Unlock. These commands will override the current door settings set by the schedules. If a command to Lock, a door is sent then the door will remain locked for either the duration passed in the command or if the duration is 0 then it will remain locked indefinitely. There should be a different event sent for the locked status to indicate that the door is locked by a command. To exit this command lock state, you need to send a restore to normal command or the timer expired on the lock command. The same logic applies to an Unlock command. An access command will momentarily open the door and do the same operation as if a valid card has been entered. When the restore to normal command or timer expired on the command action, then the door returns to the normal state of the state that is set by the schedule for locked or unlocked.

Analog Inputs

ARCO enables you to customise your system using configurable alarm, access control and building monitoring analog data input.


Name – Needs to be unique for each controller. Requires alphanumeric characters with no spaces with a maximum length of 255.


Description – Requires alphanumeric characters with a maximum length of 255. Does not need to be unique.


Logical ID – Numerical value. The unique identifier assigned to a device connected to the S1000 Control Panel.


Device – Select from the drop-down menu.


Physical ID on Device – Numerical value. Unique identifier configured into the device.


Report Events – Toggle ON or OFF to report an event.


High Priority – Toggle ON or OFF to assign high priority.


Report to Alarm Monitoring Centre – Select the monitoring centre where the data will be sent.


Sensor Type – Select from the drop-down menu.


Reporting Frequency – Numerical value. Time in minutes on how often readings are reported under steady-state conditions when not exceeding the Tolerance value.


Tolerance – Numerical value. The amount of difference between the measured input and the previously measured input before triggering and alarm.


Compensation – Numerical value. Offset subtracted to input value for error correction. 


Lower Value – Numerical value. Inputs below this value will trigger an alarm.


High Value – Numerical value. Inputs above this value will trigger an alarm.

Pulse Counter

ARCO enables you to customise your system using configurable alarm, access control and building monitoring data input.


Name – Needs to be unique for each controller. Requires alphanumeric characters with no spaces with a maximum length of 255.


Description – Requires alphanumeric characters with a maximum length of 255. Does not need to be unique.


Input Logical ID – Numerical value. The unique identifier assigned to a device connected to the S1000 Control Panel.


Device – Select from the drop-down menu.


Physical ID on Device – Numerical value. Unique identifier configured into the device.


Report Events – Toggle ON or OFF to report an event.


High Priority – Toggle ON or OFF to assign high priority.


Report to Alarm Monitoring Centre – Select the monitoring centre where the data will be sent.


Polarity – Select from the drop-down menu.


Minimum Pulse – Numerical value. Time in minutes on how often readings are reported under steady-state conditions when not exceeding the Tolerance value.


Pulse Count – Numerical value. The amount of difference between the measured input and the previously measured input before triggering and alarm.


Reporting Frequency – Numerical value. Time in seconds on how often readings are reported.

Inputs

ARCO enables you to customise your system using configurable alarm, access control and building monitoring data input.

Input Basic Settings


Name – Needs to be unique for each controller. Requires alphanumeric characters with no spaces with a maximum length of 255.


Description – Requires alphanumeric characters with a maximum length of 255. Does not need to be unique.


Logical ID – Numerical value. The unique identifier assigned to a device connected to the S1000 Control Panel.


Device – Select from the drop-down menu.


Physical ID on Device – Numerical value. Unique identifier configured into the device.


Category – Select from the drop-down menu. Define the type of data received from the input.


Area – Select from the drop-down menu. 


Hit Count – Numerical value.


Latched – Toggle ON or OFF to latch input.


Latched (Tamper) – Toggle ON or OFF to latch tamper input.


Latched (Fault) – Toggle ON or OFF to latch fault input.


Is Egress – Toggle ON or OFF to mark as Egress.


Is Primary Entry – Toggle ON or OFF to mark as primary entry.


Is on Exit Path – Toggle ON or OFF to mark as exit path.


Is Secondary Entry – Toggle ON or OFF to mark as secondary entry.


Report Events  – Toggle ON or OFF to report events.


High Priority – Toggle ON or OFF to assign high priority.


Input Advanced Settings


Report Trouble as Sealed – Toggle ON or OFF


Monitor while in-active – Toggle ON or OFF


Report to Alarm Monitoring Centre – Select the monitoring centre where the data will be sent.


Alarm Resistance – Numerical value.


Alarm Normally Open – Toggle ON or OFF


Tamper Resistance – Numerical value.


Tamper Normally Open – Toggle ON or OFF


Range Reduction Resistance – Numerical value.


Range Reduction Normally Open – Toggle ON or OFF


Masking Resistance – Numerical value.


Masking Normally Open – Toggle ON or OFF


Fault Resistance – Numerical value.


Fault Normally Open – Toggle ON or OFF


Tolerance – Numerical value.


Outputs

ARCO enables you to customise your system using configurable access control and building control data output.


Name – Needs to be unique for each controller. Requires alphanumeric characters with no spaces with a maximum length of 255.


Description – Requires alphanumeric characters with a maximum length of 255. Does not need to be unique.


Logical ID – Numerical value. The unique identifier assigned to a device connected to the S1000 Control Panel.


Device – Select from the drop-down menu.


Physical ID on Device – Numerical value. Unique identifier configured into the device.


Output Type – Select from the drop-down menu.


Normal – Generic output.


PIR – Passive Infrared Sensor.


Siren – Device that makes a prolonged loud sound as a signal or warning.


Strobe – Device used to produce regular flashes of light.


Camera – Video Recording device.


Report Events – Toggle ON or OFF to record reader events.


High Priority – Toggle ON or OFF to assign high priority.

Timer

ARCO enables you to customise your system using configurable access control and building control data output.


Name – Needs to be unique for each controller. Requires alphanumeric characters with no spaces with a maximum length of 255.


Description – Requires alphanumeric characters with a maximum length of 255. Does not need to be unique.


Logical ID – Numerical value. The unique identifier assigned to a device connected to the S1000 Control Panel.


Areas

ARCO Platform enables the support of up to eight (8) Areas in a single S1000 Smart Controller. There are a series of properties that determine the behaviour of the area.


Name – Needs to be unique for each controller. Requires alphanumeric characters with no spaces with a maximum length of 255.


Description – Requires alphanumeric characters with a maximum length of 255. Does not need to be unique.


Logical ID – Numerical value. The unique identifier assigned to a device connected to the S1000 Control Panel.


Disarm Schedule– Select from pop-up.


Auto Arm – Toggle ON or OFF


Dual User Mode – Select from pop-up.


Disable Area Count– Toggle ON or OFF


Entry Delay Fast (s) – Numerical value.


Entry Delay Slow (s) – Numerical value.


Exit Delay Fast (s) – Numerical value.


Exit Delay Slow (s) – Numerical value.


Report Events – Toggle ON or OFF to record reader events.


High Priority – Toggle ON or OFF to assign high priority.


Report to – Select the monitoring centre where the data will be sent.


Area Configuration

The arm schedule is used to determine when the area is allowed to be disarmed and when the area is not allowed to be disarmed. If the time window is enabled, then this area is allowed to be disarmed. If this time window is disabled, then this area is not allowed to be disarmed. If an area is disarmed and the time window expires such that it is no longer allowed to be disarmed, then a late to close event is generated. There is a macro condition that is triggered when an area has a late to close. If a user is trying to disarm an area and the time window prevents them from disarming this area, then there should be a user group property to allow them to access this area outside hours. In this situation, the user will be granted access for a configured time window only. If the area schedule is set to 0, then this area is permanently armed by default. A user is allowed to extend the end window of the disarm period by using the keypad to select “extend disarm” which will extend the disarm period for an additional configurable time.


Microphone

Name – Needs to be unique for each controller. Requires alphanumeric characters with a maximum length of 255.

Description – Requires alphanumeric characters with a maximum length of 255. Does not need to be unique.

Device – Select from the drop-down menu.

Physical ID on Device – Numerical value. The unique identifier assigned to a device connected to the S1000 Control Panel.

Area – – Select from pop-up.

Default Volume – Numerical value.

Report Events – Toggle ON or OFF to record reader events.

High Priority – Toggle ON or OFF to assign high priority.

Report to – Select the monitoring centre where the data will be sent.

Speaker

Name – Needs to be unique for each controller. Requires alphanumeric characters with a maximum length of 255.

Description – Requires alphanumeric characters with a maximum length of 255. Does not need to be unique.

Device – Select from the drop-down menu.

Physical ID on Device – Numerical value. The unique identifier assigned to a device connected to the S1000 Control Panel.

Area – – Select from pop-up.

Default Volume – Numerical value.

Report Events – Toggle ON or OFF to record reader events.

High Priority – Toggle ON or OFF to assign high priority.

Report to – Select the monitoring centre where the data will be sent.

Interlock

Name – Needs to be unique for each controller. Requires alphanumeric characters with no spaces with a maximum length of 255.

Description – Requires alphanumeric characters with a maximum length of 255. Does not need to be unique.

Logical ID – Numerical value. The unique identifier assigned to a device connected to the S1000 Control Panel.

Doors – Select from pop-up.

Elevator

ARCO enables you to add an Elevator profile that of an S1000 Remote IO installed with one (1) IO Expansion Card and two (2) 6Output Expansion Cards. Each module controls and monitor one (1) elevator car for up to sixteen (16) floors. Additional floors are easily scalable by adding more modules.


Name – Needs to be unique for each controller. Requires alphanumeric characters with no spaces with a maximum length of 255.


Description – Requires alphanumeric characters with a maximum length of 255. Does not need to be unique.


Logical ID – Numerical value. The unique identifier assigned to a device connected to the S1000 Control Panel.


Reader – Select from pop-up. Reader to manage access to the elevator.


Secondary Reader – Select from pop-up. Reader to manage access to the elevator.


Reader Schedule – Select from pop-up.


Card and PIN Schedule – Select from pop-up.


Card or PIN Schedule – Select from pop-up.


Output On Duration – Numerical value in seconds.


Report Events – Toggle ON or OFF to record reader events.


High Priority – Toggle ON or OFF to assign high priority.


Report to – Select the monitoring centre where the data will be sent.


Floors – Click the Add floor button to select a Floor profile for the elevator. Click Clear all floors to remove.

Floor

RCO enables you to create independent floor profiles to create specific access, properties and management.


Name – Needs to be unique for each controller. Requires alphanumeric characters with a maximum length of 255.


Description – Requires alphanumeric characters with a maximum length of 255. Does not need to be unique.


Logical ID – Numerical value. The unique identifier assigned to a device connected to the S1000 Control Panel.


Unlocked Schedule – Select from pop-up. 

Camera

ARCO enables you to add Cameras that can output their display on your Dashboard.


Name – Needs to be unique for each controller. Requires alphanumeric characters with a maximum length of 255.


Description – Requires alphanumeric characters with a maximum length of 255. Does not need to be unique.


Device – Select from the drop-down menu.


Physical ID on Device – Numerical value. The unique identifier assigned to a device connected to the S1000 Control Panel.


Cameras are installed and configured based on its manufacturer’s instructions.

Services

References

Alarm Type


Please refer to the Alarm section below for further details.

Contact ID


Please refer to the Contact ID section below for further details.

Schedule


Please refer to the Schedules section below for further details.

Rules

Lorem ipsum dolor sit amet, consectetur adipiscing elit. Ut elit tellus, luctus nec ullamcorper mattis, pulvinar dapibus leo.

  • Rule Name – Needs to be unique to each profile. Requires alphanumeric characters with no spaces and a maximum length of 255.

  • Run on device – Toggle ON or OFF. Save the rule on the S1000 Smart Controller to run even when offline.

  • Condition match – Select using the tick box.
    -> All condition match – All conditions must match to run the rule.
    -> Any conditions match – Only one condition must match to run the rule.

  • Conditions – Select from the drop-down menu.
    -> Select point type – Select from the drop-down menu.
    -> Select event – Select from the drop-down menu.
    -> Select status – Select from the drop-down menu.

  • Add new condition – Click to create a new condition field.


The required fields may look different depending on your System Configuration.

  • Actions – Select from the drop-down menu. Action to be performed if the condition results are true.
    -> Target – Select from the drop-down menu.
    -> Action – Select from the drop-down menu.

  • Duration – Check to set time of action duration.

  • Add action – Click to create a new action field.

  • Conditions – Select from the drop-down menu.
    ->Select point type – Select from the drop-down menu.
    ->Select event – Select from the drop-down menu.
    ->Select status – Select from the drop-down menu.

The required fields may look different depending on your System Configuration.

Status

Different industries require different information for their system operations. ARCO enables you to manage what information is obtained and presented on the system.

ARCO enables you to monitor and configure the behaviour of each component of the ARCO Platform.

Appendix D – Sample Data Configuration

Sample Roles

ARCO includes built-in standard Roles Types that define the most commonly used ways of accessing features. Except for the Administrator role, you can modify or delete all common roles.

Role

Description

Dashboard

Administrator

This role manages the system, and it has access to all functions within the system

This role already exists. It can’t get deleted

Menus: All

Display system monitoring related information, including uptime, service status, etc.…

Card Enrolment

This operator creates users within the system for new employees and assigns credentials and permissions to them

They should see the “users” menu and submenus. They can add, delete, edit user information, but have view-only access on roles

They might be able to view user access logs

Display user-related information (Number of users, user activity, etc.)

Personnel Manager

This operator has all the functions of the “Card Enrolment” user, plus has the ability to define role permissions

Similar to Card Enrolment

Alarm Monitoring

This operator is concerning with responding to alerts within the system

They can view sites, profiles, events, users. They can perform actions on “Alarm” objects (Not added to the system yet). They can perform actions on site-related objects (Open doors, isolated points, etc.)

Display alarm related information, outstanding alerts, actions alerts, Map of alarms, etc.…

Reporting User (e.g. Security Head)

This user might need to generate reports on the system, based on how long it took to activate an alarm, fix a faulty door, unusual access activity, power consumption, temperature, etc.…

They probably need view access to everything within the Site. They can create reports and visualisations.

Customised data showing common report visualisations

Technician

This operator might occasionally use the web interface, and often use a basic interface on their mobile device

They can edit profiles, add a site to the system, move a site to a new profile (usually)

They need to see events and status-related information for a specific site

They cannot action alarms, or view user details (usually)

Display a list of faults in the system on a map

Site/ATM Technician

This user does not use the ARCO Platform interface but has a card and access devices on the keypad

They can perform actions on devices for a specific site that they have been granted access to for the day. Sometimes they will have permission for all sites at any time of day, and in this case, the system will record that the technician accessed the site

Once every few months they might log into the system to change their PIN (Future development)


Basic Cardholder

This user does not use ARCO Platform but might be an office worker that needs to access specific doors at their regular place of employment

They will perform the “access” action on doors within the system, by swiping their card at the reader next to the door

Once every few months they might log into the system to change their PIN (Future development)


Advanced Cardholder

This user does not use the ARCO Platform, but might be an office worker that needs to access specific doors at their regular place of employment, and might need access to several sites

They will perform the “access” action on doors within the system, by swiping their card at the reader next to the door

Once every few months they might log into the system to change their PIN (Future development)


Sample Regular Expressions

Field

Expression

Format Samples

Description

Name

^[a-zA-Z”-‘\s]{1,40}$

John Doe O’Dell

Validates a name. Allows up to 40 uppercase and lowercase characters and a few special characters that are common to some names.

Social Security Number

^\d{3}-\d{2}-\d{4}$

111-11-1111

Validates the format, type, and length of the supplied input field. The input must consist of 3 numeric characters followed by a dash, then 2 numeric characters followed by a dash, and then 4 numeric characters.

Phone Number

^[01]?[- .]?(\([2-9]\d{2}\)|[2-9]\d{2})[- .]?\d{3}[- .]?\d{4}$

(425) 555-0123
425-555-0123
425 555 0123
1-425-555-0123

Validates a phone number. It must consist of 3 numeric characters, optionally enclosed in parentheses, followed by a set of 3 numeric characters and then a set of 4 numeric characters.

E-mail

^(?(“”)(“”.+?””@)|(([0-9a-zA-Z]((\.(?!\.))|[-!#\$%&’\*\+/=\?\^`\{\}\|~\w])*)(?<=[0-9a-zA-Z])@))(?(\[)(\[(\d{1,3}\.){3}\d{1,3}\])|(([0-9a-zA-Z][-\w]*[0-9a-zA-Z]\.)+[a-zA-Z]{2,6}))$

someone@example.com

Validates an e-mail address.

URL

^(ht|f)tp(s?)\:\/\/[0-9a-zA-Z]([-.\w]*[0-9a-zA-Z])*(:(0-9)*)*(\/?)([a-zA-Z0-9\-\.\?\,\’\/\\\+&%\$#_]*)?$

http://www.microsoft.com

Validates a URL

ZIP Code

^(\d{5}-\d{4}|\d{5}|\d{9})$|^([a-zA-Z]\d[a-zA-Z] \d[a-zA-Z]\d)$

12345

Validates a ZIP Code. The code must consist of 5 or 9 numeric characters.

Non- negative integer

^\d+$

0
986

Validates that the field contains an integer greater than zero.

Currency (non- negative)

^\d+(\.\d\d)?$

1.00

Validates a positive currency amount. If there is a decimal point, it requires 2 numeric characters after the decimal point. For example, 3.00 is valid, but 3.1 is not.

Currency (positive or negative)

^(-)?\d+(\.\d\d)?$

1.20

Validates for a positive or negative currency amount. If there is a decimal point, it requires 2 numeric characters after the decimal point.

Sample Access Scenarios

Scenario 1 – Access a door with an invalid card

Present a card on a reader that is configured to be on a door and verify that a valid card will not access the door and generate an invalid LED on the reader. Nothing else should happen at the door.

Scenario 2 – Access a door with a valid card

Present a card on a reader that is configured to be on a door and verify that a valid card will access the door. There should be a “valid card” event generated and a valid LED on the reader. When the door is accessed test the following scenarios

  • – Strike time will activate, and if the door is not opened during the shunt time there is an event “ access not taken”
  • – Strike time will activate and if the door is opened and then closed during the shunt time there is an event “ access taken”
  • – Strike time will activate and if the door is opened and then left open up to the embarrassment time there is an event “access taken” and the buzzer starts on the keypad and then if the door is closed the buzzer will stop.
  • – Strike time will activate and if the door is opened and then left open up to the embarrassment time there is an event “access taken” and the buzzer starts on the keypad and then if the door is not closed an “Ajar” event is generated and after this when the door is closed the buzzer will stop and then an “Ajar reset” event is generated.

Scenario 3 – Force open a door

If the Door is opened without a valid access card or command, then a Door ‘Forced” event should be generated and the buzzer on the keypad should start. When the Door is closed and the door contact reset then there should be a Door “Forced Reset” event generated.

Scenario 4 – Access a door with egress

Press the egress input to access the door. There should be a “Door Accessed by egress” event generated and a valid LED on the reader. When the door is accessed test the following scenarios

  • – Strike time will activate and if the door is not opened during the shunt time there is an event “ access not taken”
  • – Strike time will activate and if the door is opened and then closed during the shunt time there is an event “ access taken”
  • – Strike time will activate and if the door is opened and then left open up to the embarrassment time there is an event “access taken” and the buzzer starts on the keypad and then if the door is closed the buzzer will stop.
  • – Strike time will activate and if the door is opened and then left open up to the embarrassment time there is an event “access taken” and the buzzer starts on the keypad and then if the door is not closed an “Ajar” event is generated and after this when the door is closed the buzzer will stop and then an “Ajar reset” event is generated.

Test 5 – Access a door with a command

Send a command from Arco to Access a door. There should be a “Door Accessed by command” event generated and a valid LED on the reader. When the door is accessed test the following scenarios

  • – Strike time will activate and if the door is not opened during the shunt time there is an event “ access not taken”
  • – Strike time will activate and if the door is opened and then closed during the shunt time there is an event “ access taken”
  • – Strike time will activate and if the door is opened and then left open up to the embarrassment time there is an event “access taken” and the buzzer starts on the keypad and then if the door is closed the buzzer will stop.
  • – Strike time will activate and if the door is opened and then left open up to the embarrassment time there is an event “access taken” and the buzzer starts on the keypad and then if the door is not closed an “Ajar” event is generated and after this when the door is closed the buzzer will stop and then an “Ajar reset” event is generated.

Scenario 6 – Access a door with a valid card and PIN

Set up a schedule to be Card and PIN. Set a PIN for the user in Arco. Present a card on a reader that is configured to be on a door and verify that the reader accept LED will flash waiting for a PIN. Enter a valid PIN to access the door. There should be a “valid card” event generated and a valid LED on the reader and the Door strike should activate.

Scenario 7 – Access a door with a valid card or PIN

Set up a schedule to be Card or PIN. Set a PIN for the user in Arco. Present a card on a reader that is configured to be on a door and verify access of the door. There should be a “valid card” event generated and a valid LED on the reader and the Door strike should activate. Repeat the test with a PIN instead of a card and same thing should happen.

Scenario 8 – Lock schedule

Set up a schedule to be locked on a Door. When this schedule goes active the door will remain locked. The denied LED will be on the reader, and an event will be generated “Door Locked”. When the schedule becomes inactive the door will go back to normal state and reader LED will go off and event “Door restored” generated. Test while the door is locked that no valid or invalid cards are allowed access to the door. There should be events generated whenever this happens.

Scenario 9 – Unlock schedule

Set up a schedule to be unlocked on a Door. When this schedule goes active the door will remain unlocked. The accept LED will be on the reader, and an event will be generated “Door unlocked”. When the schedule becomes inactive the door will go back to normal state and reader LED will go off and event “Door restored” generated. Test while the door is unlocked that valid cards are allowed access to the door and invalid cards are denied. There should be events generated whenever this happens.

Scenario 10 – Lock schedule and Unlock schedule at the same time

Set up a schedule to be locked on a Door and unlocked on a Door at the same time. When this schedules go active the door will remain locked. The denied LED will be on the reader, and an event will be generated “Door Locked”. When the schedule becomes inactive the door will go back to normal state or the unlocked state depending on the schedule time and reader LED will go off or accept LED on and event “Door restored” or “Door Unlocked” generated. Test while the door is locked that no valid or invalid cards are allowed access to the door. There should be events generated whenever this happens.

Appendix C – Event List Definition

Events

Definition

Access Denied

User does not have access credentials

Access Denied – Antipassback

User did not comply with antipassback conditions (did not log out)

Access Denied – Card Blocked

Card credential blocked

Access Denied – Card Expired

Card credential outside date of validity

Access Denied – Card Not Programmed

Card credential not listed in the system

Access Denied – Egress

Egress is disabled and will not allow access (outside time schedule)

Access Denied – Reader Locked

Credential cant be used because the reader is locked

Access Denied – Suspended

User credential is suspended

Access Download Fail

Unable to synchronize credential information from ARCO

Access Granted

User credential accepted

Access Granted – Antipassback

User credential accepted and complies with antipassback conditions

Access Granted – Duress

Duress is enabled (User in distress)

Access Granted – Egress

Egress button has been pushed and access is allowed

Access Not Taken

User did not enter the door

Access Taken

User entered the door

Activated

Used for indicating that an output is on

Ajar

Door is open for an extended time

Alarm

Alarm signal received

Analog Alarm

Analog alarm signal received

Analog Value

Value received is analog

ARC Path 1 Failed

Connection to Alarm Reporting Center 1 has failed

ARC Path 2 Failed

Connection to Alarm Reporting Center 2 has failed

ARC Path 3 Failed

Connection to Alarm Reporting Center 3 has failed

ARC-1 Offline

Alarm Reporting Center 1 is offline

ARC-2 Offline

Alarm Reporting Center 2 is offline

ARC-3 Offline

Alarm Reporting Center 3 is offline

Arm Pending

Exit timer is running

Armed

System is armed. Alarms will be reported

Arming Failed

System arm failed

Backup Communication Settings

Connection settings are for backup path

Backup Connection

Connection to Arco is not the primary connection

Battery Charger Failed

The battery charger is not functioning

Battery Failed

The battery is not functioning

Battery Fully Charged

Battery charge is at full capacity

Battery Level

Battery charge level

Battery Test Result

Battery status report

Card Swiped

Card used on reader

Configuration Defaulted

Configuration has be changed to default

Configuration Download Fail

Configuration has failed to download

Configuration Downloading

Configuration is downloading

Configuration Updated Successfully

Profile configuration is updated in the controller OK

CPU Temperature

Temperature of the control panel central processing unit

CPU Temperature Fail

Temperature of the CPU exceeds normal (below 10°C or above +70°C)

Custom 1

Custom Role 1

Custom 1 Extend

Access time of Custom Role 1 is extended

Custom 2

Custom Role 2

Custom 2 Extend

Access time of Custom Role 2 is extended

Device Substitution

A device has been tampered and replaced

Disarmed

Area lock is disarmed

Door Contact Trouble

Door contact input is in a trouble condition

Duress

Duress is enabled (User in distress)

Elapsed


Entry Timer Active

Entry timer for disarming an area is running.

Ethernet Offline

Main ethernet connection is not connected

Ethernet Offline (Expansion)

Expansion card ethernet is not connected

Expired

Used to indicate a timer has expired

External Temperature

Temperature around the enclosure

External Temperature Fail

Temperature around the enclosure exceeds normal (below 10°C or above +70°C)

Fault

Device has indicated a fault confition

Firmware Available in Inactive Bank

Controller firmware is available in the secondary memory bank

Firmware Download Failed

Firmware download unsuccessful

Firmware Downloaded Successfully

Firmware download successful

Firmware Downloading

Firmware is in the process of being downloaded

Forced

Used to indicated that a door had been opened without a valid access

Inhibited

Prevent alarm from sending a signal

Input Changed (Test)


Invalid Login Attempt

User has attempted to enter a PIN that is not valid

Isolated

Prevent alarms from sending external signals

Latch

An input or device tamper/offline alarm has been latched on

Late to Close

An area has not closed based on the programmed schedule

Listening

Indicates a microphone is in a mode for listening to audio

Locked

This is to indicate the state of a door preventing any access

Logged In

User logged in

Logged In – BLE

User logged in using ARCO Setup

Muted

Indicates a microphone or speaker is disabled from working

Offline

Device Offline

Onboard Temperature

Temperature around the controller

Onboard Temperature Fail

Temperature around the controller exceeds normal (below 10°C or above +70°C)

Open

Indicates that a door is seen as being in the open state

Partial Armed

Area mode whereby certain inputs can be masked for this mode.

PIN Changed

PIN has been changed for a user

Power Failed

Power supply is not functioning

PSTN Line Offline

PSTN line is not connected

Restarted

Controller has restarted

Running


SD Card Failure

Failed to read from SD Card

Sealed

State of an input when it is not in alarm

Self Test Failed

The self-test of an input failed.

Shutdown Pending

Controller battery level

Signal Fail

GPRS Signal has failed.

Signal Level

GPRS signal is OK and at level Good, OK, Poor

Speaking

Speaker mode of the listen in is enabled for talkback

Strike Trouble

Door strike contact monitor is in trouble state

Suspect Latch

A device has had too many activations during the current mode

Tamper

Alarm for interference on hardware enclosures

Tamper (Masking)


Tamper (Open Circuit)


Tamper (Range Reduction)


Tamper (Short Circuit)


Test Mode

Test mode is activated

Time Changed

Internal system time has been modified

Too Many Invalid Logon Attempts

User has made too many login attempts

Unknown Message

Message is not defined

Unlocked

Door state is unlocked allowing access without presenting a card

Unmasked Alarm

The raw state of an input

User Count

Number of Users

User Database 90%+

User database capacity is more than 90% full

Value

Analog input value

Appendix B – Report Data Fields

Listed below are Data Fields that require definitions.
ARCO Platform supports custom fields, so it is possible your company-specific custom fields are not included.

User Activity

Event ID

Unique Identifier for an event.

Event Name

Name of the event.

Organisation

Provide a mean to partition the system so that a company or the users of that company can only access devices within their scope.

Scope

Permissions of a User based on the Organisation.

Target ID

Unique Identifier for a target.

Target Name

Name of the event.

Time

Time when the activity was performed.

Credential Details

Card Number

Value of the card registered to the credential.

Credential ID

Unique Identifier for a credential.

Credential Type

Classification of the credential assigned.

Facility


Issue


Organisation

Provide a mean to partition the system so that a company or the users of that company can only access devices within their scope.

Profile


Status

Displays if the Credential is Active or Blocked. Only Active credentials can access Sites, Areas or Doors.

User ID

Unique Identifier for a user.

Valid From

Date and Time when the credential validity starts.

Valid To

Date and Time when the credential validity ends.

User Information

Active Directory

Check mark if a user is linked to an Active Directory.

Extended Time

Check mark if a user is allowed extended login time.

State

Device

Type of device.

Device ID

Unique Identifier of the device.

Name

Name of the device.

Organisation

Organisation where the device belongs to.

Roles

Bluetooth User

Check mark if the role is a Bluetooth User

Executive

Check mark if the role is an executive.

Organisation

Organisation where the role belongs to.

Permissions

Access granted to the role.

Role ID

Unique Identifier for the role.

Role Name

Name of the role.

Role Type

Access Roles, Operator Roles or Callout Roles based on the user’s function in your organisation.

Scope

Permissions of a role based on the Organisation.

Tags

Metadata for search and reporting parameters.

Sites

Address

Location of the site.

Calendar

Name of the calendar configuration used.

Calendar ID

Unique identifier of the calendar configuration.

Gateway ID

Unique identifier of the gateway.

Latitude

Geographic coordinate that specifies the north–south position of a point on the Earth’s surface.

Longitude

Geographic coordinate that specifies the east–west position of a point on the Earth’s surface.

Name

Name of the site.

Profile ID

Unique identifier of the profile.

Site ID

Unique identifier of the site.

Audit Logs

Action Type


Event Details

Description of the event

Event ID

Unique identifier of the event.

Event Name

Name of the event.

Target ID

Unique identifier of the target.

Target Name

Name of the target.

Time (UTC)

Timestamp relative to the Coordinated Universal Timezone.

Time (Site)

Timestamp relative to the Site location Timezone.

Appendix A – Glossary of Terms

A

Alarm Confirmation TimeDuration of time an alarm signal is received before an alarm message triggered.
Analog  A continuous signal for which the time-varying feature.

B

BLE Access PointControls the Bluetooth receiver of the S1000 Control Panel

C

CredentialRepresents some form of identification.   The most common form will be the byte representation of raw card data, as scanned by a reader when swiping a card or typing a PIN.
Contact IDAdemco alarm communications protocol.

D

DashboardProvides graphical and geographical screens provide easy management and data consolidation showing the current and historical status of your system.
DigitalA signal in which the original information is converted into a string of bits before being transmitted.

E

Ethernet (TCP)Transmission Control Protocol cable connection.
Ethernet (UDP)User Datagram Protocol cable connection.

G

GPRS (TCP)Transmission Control Protocol mobile connection.
GPRS (UDP)User Datagram Protocol mobile connection.

L

Logical IDThe unique identifier assigned to a device connected to the S1000 Smart Controller.

N

Navigation PanelLinks to different sections for each module can consistently be found on the left side of the screen.

P

PSTNPublic Switched Telephone Network connection.
Pulse CounterA signal pulses during a specified amount of time.

Q

Quick AccessCommands displayed when hovering the mouse pointer over an item or information.

R

RoleControl how and what people can access on your system
Role CapabilitiesCapability to perform certain ARCO features are assigned to specific Operator Roles.

S

Search barEnables you to search for specific information in different ARCO Platform interface. The search bar automatically starts searching after typing at least four characters.
Suspect Activation CounterThe number of times an alarm trigger will send before it stops.
SIASecurity Industry Association alarm communications protocol.
SitesDifferent locations in your system.

W

WiFi (TCP)Transmission Control Protocol wireless connection.
WiFi (UDP)User Datagram Protocol wireless connection.